Visit the Weebly - Student Login again and sign in with the username and password provided to you last time. If you can't remember your login information, see the teacher.
Once you sign in and are on the main editor page to work on your site, follow the steps below for today's activity:
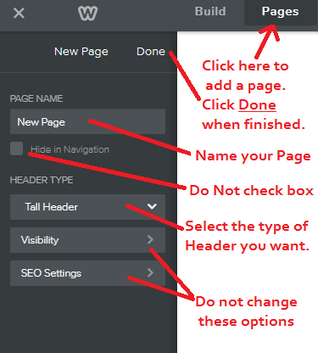
1. At the top menu, look for "Pages"
2. After clicking on Pages, some options will appear on the left panel.
3. We are going to start today with a Standard Page, but know that this is where we will go to also make pages such as pages for Shopping, Blogs, etc.
4. Give your Page a name. This page we make will be for links, so you can call it "Links", "Website Links", or something else to go with your site's theme. Make sure the "Hide in Navigation" box is NOT checked. This will allow the title of your page to appear on your website's Home page menu to access.
5. You can select the type of Header you want. Options include a tall or short header, no header, or a landing page. Click on each one to see how they look. This can always be changed again later. Choose which ever type of Header you would like for this page. Remember to place an image/title inside! (If you choose No Header, you will need to put a title or something else at the top of the page in its place)
6. Do not change anything on the last two options.
Now your new page is made! Click back to Pages at the top to go back and forth between the pages you make. Then click on "Build" when you want to edit that page. See below for steps to create website links!
Spend your remaining class time today working on your links page. Try to be creative and use a combination of text and images to link! The more content you have, the better your final grade will be!
****REMINDER****
In order for your website to be visible to others, you MUST select the Publish button!
You will need to push that button every time you make a change to your site!
This includes when new pages are added!
Remember that all photos and links put into your site need to be school appropriate!
There are two ways to create links!
Create Links with Text:
- Type in the words that you will want others to click on (example: Google)
- Highlight the text with your mouse.
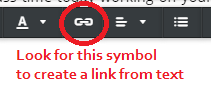
- Then look for the chain symbol on the menu to edit your text. It will be in the middle.
- Click on the first option: Website URL
- Type in the website address you want to be taken to (example: www.google.com)
- Click off of the screen to leave the menu. Your text should now be a link in blue!
- Publish your site to update it.
- Type in your website's address to visit the site and test out your link to make sure it works!
Create Links with Images:
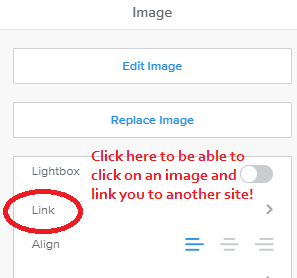
- Once you have an image put onto your website, click on the image.
- A new menu will appear to make changes to your photo.
- Click on the word: Link
- Then put in the website address you want to use just like it is described for text.
(Example: www.google.com)
See below for visuals of where to go to make links.
Once you sign in and are on the main editor page to work on your site, follow the steps below for today's activity:
1. At the top menu, look for "Pages"
2. After clicking on Pages, some options will appear on the left panel.
3. We are going to start today with a Standard Page, but know that this is where we will go to also make pages such as pages for Shopping, Blogs, etc.
4. Give your Page a name. This page we make will be for links, so you can call it "Links", "Website Links", or something else to go with your site's theme. Make sure the "Hide in Navigation" box is NOT checked. This will allow the title of your page to appear on your website's Home page menu to access.
5. You can select the type of Header you want. Options include a tall or short header, no header, or a landing page. Click on each one to see how they look. This can always be changed again later. Choose which ever type of Header you would like for this page. Remember to place an image/title inside! (If you choose No Header, you will need to put a title or something else at the top of the page in its place)
6. Do not change anything on the last two options.
Now your new page is made! Click back to Pages at the top to go back and forth between the pages you make. Then click on "Build" when you want to edit that page. See below for steps to create website links!
Spend your remaining class time today working on your links page. Try to be creative and use a combination of text and images to link! The more content you have, the better your final grade will be!
****REMINDER****
In order for your website to be visible to others, you MUST select the Publish button!
You will need to push that button every time you make a change to your site!
This includes when new pages are added!
Remember that all photos and links put into your site need to be school appropriate!
There are two ways to create links!
Create Links with Text:
- Type in the words that you will want others to click on (example: Google)
- Highlight the text with your mouse.
- Then look for the chain symbol on the menu to edit your text. It will be in the middle.
- Click on the first option: Website URL
- Type in the website address you want to be taken to (example: www.google.com)
- Click off of the screen to leave the menu. Your text should now be a link in blue!
- Publish your site to update it.
- Type in your website's address to visit the site and test out your link to make sure it works!
Create Links with Images:
- Once you have an image put onto your website, click on the image.
- A new menu will appear to make changes to your photo.
- Click on the word: Link
- Then put in the website address you want to use just like it is described for text.
(Example: www.google.com)
See below for visuals of where to go to make links.
 |  |
 RSS Feed
